- Home
- C++ with Qt Tutorial
- The first program
Learn C++ with Qt, Part 002: The first program
After the installation of the C++ programming tools and the Qt development environment and the first overview of the Qt Creator IDE we are (finally) ready to start with writing our first program. Just follow the different steps below:
- create a new programming project
- edit the program by adding some lines of code
- learn how it works
- learn how to get the same functionality using different coding
- (optionally) download the source code
This page (and the following pages for this tutorial) uses JavaScript to display the code for the program within embedded editor objects. If you have JavaScript disabled, you won't be able to see the properly formatted code, which will make it difficult to cut and past the code into your own code editor.
Creating a new project
For this program, you should create a new project. In order to do this, start the "Qt Creator" program first.
In the Qt Creator you can create a new project either by clicking on the "Create Project..." button on the welcome screen or by choosing the option "New file or project" from the file menu.
In both cases you should see a dialog window where you can choose from different project templates on the left side, with further detail options on the right side:
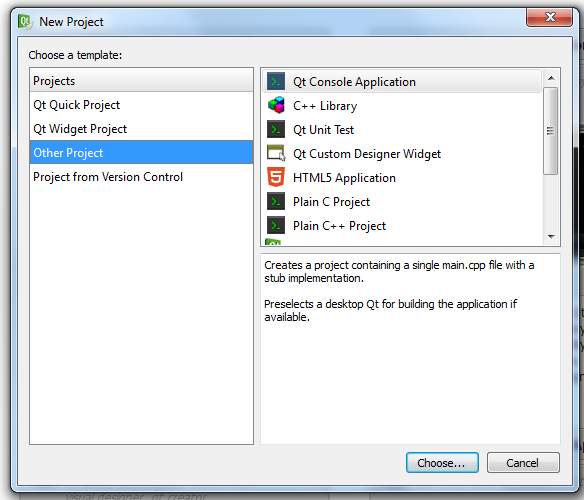
For the first small program, select the project template "Other Project" on the left and choose the option "Qt Console Application".
The project templates act as a framework for the development of your application.
If you already know which kind of application you will be developing, the according project template will give you some basic coding for the application.
Additionally the project template already contains information on the header files and function libraries which are necessary for this kind of application.
After selecting the "Choose..." button from the dialog window you are automatically led through further dialog steps by the project wizard function.
The first step is to select a name for the new project and set a base directory for the project:
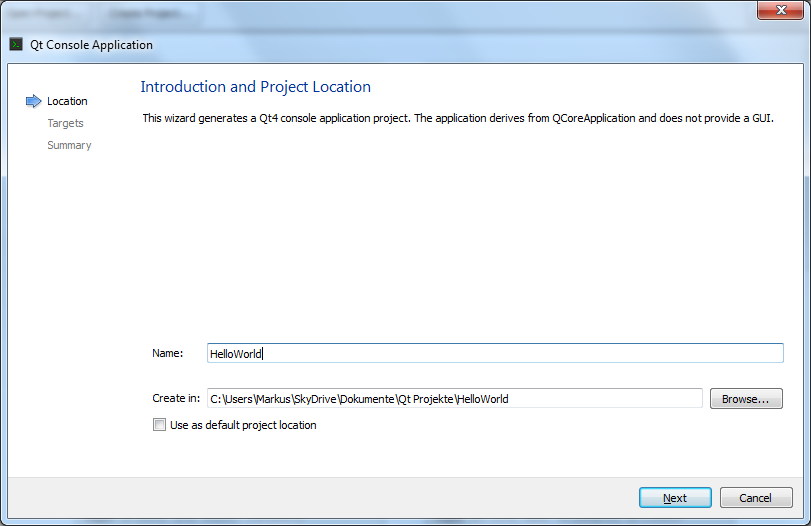
All new files in this project will then be created in a subdirectory with the name of your project.
For this first program, enter "HelloWorld" as the project name and select the base directory. You can set the new base directory to be the standard path for all your Qt development projects by marking the relevant field "Use as default project location" in the dialog window.
After entering this information and clicking on the button with the label "Next" you will see a new dialog with the target setup for your project:
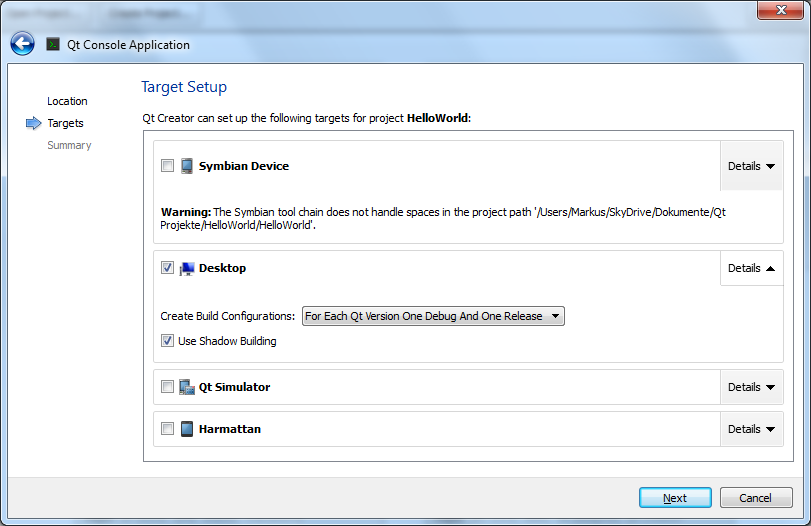
The options for the build target on this screen depend on the previous installation options, so your list of possible targets may look different from what you can see on my screenshot.
This first program is a simple application for a PC or Mac. For this, just mark the target option "Desktop" and click on the "Next" button.
This will bring you to the summary screen of the project creator wizard:
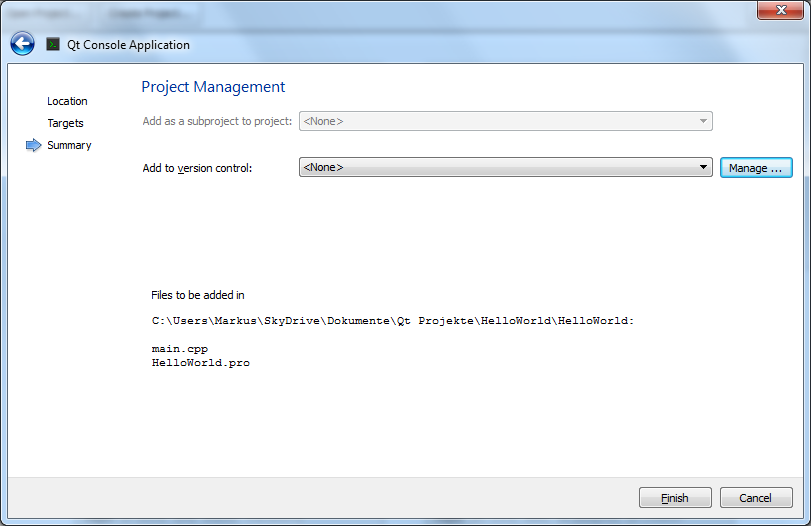
The "Add to project" selection should be deactivated. This is only active if your new project is of a different type which could be integrated into an existing project (like a new C++ class, a new Qt form etc.).
The second option "Add to version control" should be activated. For this first program you can keep the default setting "<None>".
With the version control option you can use one of the supported version control programs in order to manage different versions of the application you are developing.
The version control software tracks different versions for all files in your project. If a bigger change in the software development turns out to be bad for performance, unusable or just not needed any more, you can go back to an earlier version.
In projects where different developers are working on different parts of an application, the version control keeps the files consistent. It controls the access and manages the changes for all files which are part of the project, so no two developers can change the same file at the same time.
For single developers, version control becomes useful if your application gets bigger and if you want to publish your application. It makes sense to keep all final and published versions of your program and keep track of all changes in case anything goes wrong.
Underneath the project management options you get a short summary telling you the directory where your project files will be stored and which files will be created by the project creator wizard.
Changing the code for the HelloWorld program
After clicking on the "Finish" button in the dialog you will automatically be presented with your new project in the edit mode of the Qt Creator development environment:
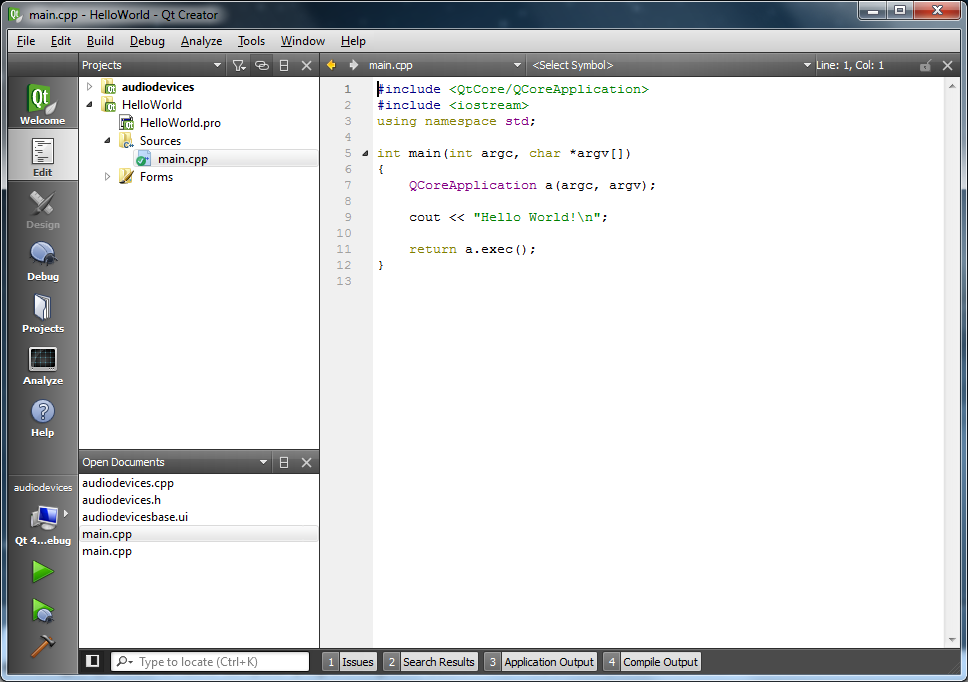
The "Projects" view should contain your new "HelloWorld" project, with a "HelloWorld.pro" project definition file and a "main.cpp" source code file under the "Sources" folder (like in the above screenshot). The "main.cpp" file should already be opened in the edit view on the right side, looking like this:
This is just a hollow framework without much functionality, but it can already be compiled into a working program. Before we do that, let's add some additional lines of code first:
- after the "#include <QtCore/QCoreApplication>" line, add an additional line with the text "#include <stdio.h>"
- after the line with "QCoreApplication a(argc, argv);", add a line with the text "printf("Hello, World\n");"
With the additional coding, your "main.cpp" source code should now look like this:
With newer versions of Qt, you will just see "QCoreApplication" instead of "QtCore/QCoreApplication". It's the same library with the same functions, just slightly moved up from the subdirectory it was previously located in.
Now we can start the program and look at what it does.
Just click on the geen "run" button or select "Run" from the "Build" menu. You might have to save "main.cpp" first.
Now the compiler and linker will turn our program into an executable file, while a small progress bar is displayed on the left side right above the project icon.
At the end of the build process the program will start and you will see a simple window with the text "Hello, World" inside it:
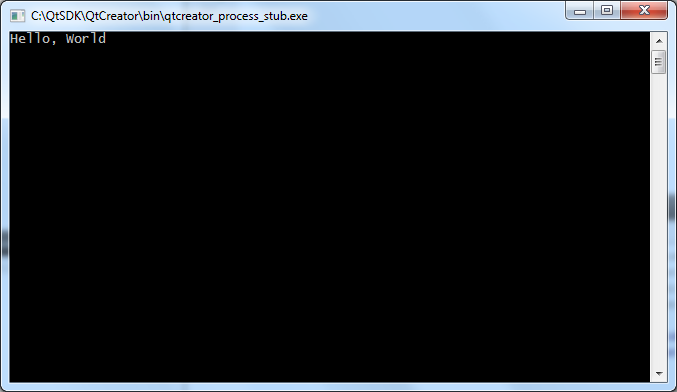
It's not really impessive, but then all great things start small ... :-)
To exit the program, just close the the window with the standard close icon in the upper right corner of the window.
How does it work?
Let's switch back to the coding in the "main.cpp" file of our "HelloWorld" project and take a closer look at how this all works. Even with such a simple program and so few lines of code there are already a lot of things happening here:
- the central source code file for the main program loop
- references to header files
- references to objects and methods from the Qt library
- usage of standard input and output functions
- main program function
- main function return value
- main function parameters
- usage of an application object
- text output
- main application loop
The C++ source code file
First of all, the file extension ".cpp" of the "main.cpp" file tells us that this file contains lines of instructions in the C++ programming language. This extension has long been established as the standard for this language, independed of the target operating system.
Header files
The first two lines in "main.cpp" start with the "#include" command.
The "#" character marks this as an instruction to be carried out during the build process by the C++ compiler and linker. Such commands are not part of the logic of our actual application. They tell the compiler and linker tools to pre-process our source code.
Instructions like these which are started with "#" at the beginning of the line are generally known as "preprocessor directives". The preprocessor is a piece of software that is started before a C or C++ program is compiled into machine code - mostly automatically these days.
The preprocessor takes the C or C++ code and looks for the preprocessor directives. Where ever it finds such a directive, it processes it into longer, often more complex code. So the preprocessor directives act similar to placeholders or text macros.
The final, fully preprocessed code is then passed on to the compiler and translated into machine code.
The "#include" command especially tells compiler and linker to include the coding from the include files which are listed after the command. One include command can only be used for the inclusion of one include file, but you can include many files by using several lines with include instructions, one for each file you need.
While the compiler adds any lines of code from the listed include file into the source code you wrote before turning it into executable code, the linker will add executable code from any pre-compiled libraries which you included in your project.
From our simple example, you can see two inclusions:
- QtCore/QCoreApplication
- stdio.h
Both files are surrounded by simple wedges (the "greater than" and "less than" characters). This tells compiler and linker to automatically search for these files in the standard directories for header and library files.
As an alternative, you can add the complete directory path for each file in front of the file name.
If you do this however, you have to put the complete file path into double quotes.
This will change the relative file path into an absolute file path, which makes it more difficult to transfer your source code to a new Qt installation or C++ compiler.
If a header file is put into double quotes without further path information, it is automatically searched in the directory of the current project.
Qt object class include
The "QtCore/QCoreApplication" include was automatically added from the project template for the Qt Console application. This contains the definitions for the "QCoreApplication" object class which is part of the "QtCore" object library.
Apart from the "QtCreator" development environment, Qt consists of several function and object libraries with the according header and library files.
The essential objects and functions are part of the core library named "QtCore" which contains basic and often used functionality.
Here we only need the "QCoreApplication" object class, so instead of including all core functions and objects by simply writing the command "#include <QtCore>", we use "#include <QtCore/QCoreApplication>".
Standard input/output include
The second include "stdio.h" adds the functionality from the standard C function library for input and output of text and other data.
This is not part of the Qt library. It belongs to the standard C and C++ libraries which are installed together with the basic C++ programming tools (e.g. Microsoft Visual C++).
There are two noteworthy facts here:
- The "stdio" library is not C++ code. It comes from the "C" programming language which is the basis for the "C++" programming language. As the "C++" language contains all elements of the "C" language, definitions and libaries from this language can still be used in the C++ language.
- The standard input/output libary can be replaced by other function or object libraries with the same functionality. For example, we could use "iostream" instead, but then the name and syntax for the text output function would be different. There are often alternative libraries which provide the same functionality, just choose the one which is best for your application.
The main function
Underneath the two includes you can see a block starting with "int main(int argc, char *argv[])", surrounding the rest of the instructions with curly brackets.
This is the main function. It has to be present in every program which you want to turn into an executable application.
If the source code of your application is split up into several files contained in the same project, you have to make sure that there is only one main function within the same project.
Let's take a closer look at the first line of the "main" function:
"main" function: Return value type
Before the name of the function ("main") there is an "int" declarator.
In C and C++, all type definitions for the data type of variables are written before the name of the variable. The type and name together define the variable within the program.
Here, the data type "int" marks an integer value. Instead of a variable, it stands in front of the name of the function. This means that the function will return a value of the given data type (here an iteger value) once the function is left during the execution of the program, similar to a function in a mathematical equation.
Used with the main function of the program, this allows us to pass error values to the operating system if the program is terminated due to an internal error.
In other functions, we can use the same mechanism to get the result of a computing operation.
"main" function: Function parameters
Another thing you can recognize from the start of the "main" function are the two parameters inside the brackets just after the name of the function:
The parameters are separated by a comma. Just like the function itself, the data types for the parameters stand before the name of the parameter itself.
The definition for the two parameters is actually identical to the way in which variables are defined within a function or program.
In fact, the parameters are just that - variables. The only difference is that they are part of the function definition. So when you use the function, you also have to enter some values or other variables which then set the values of the parameter variables within the function.
So, let's take a closer look here:
"int argc" defines an integer variable with the name "argc", so it needs a full, rounded numerical value without any additional decimal places.
"char *argv[]" at first looks like a simple variable for characters. But it is more than that. The asterisk ("*") in front of the variable name "argv" defines it as a pointer to a character value. In addition to this, the two square brackets behind the variable name ("[]") turn it into a whole array of character values.
I'll explain pointers and arrays in a later part of my C++ programming tutorial.
For now it's only important to know that the definition "char *argv[]" basically stands for a whole charater string. You can pass it several characters, words etc. at once.
Another thing that's important to notice here:
This special pair of parameters with these names and type definitions is usually only used for the "main" function.
It is a special setup which actually allows the program to receive input from the operating system right at the start of the program.
If the program is started by typing its name in a command line interface, you can type in parameters and values right behind the name of the program, separated by blanks.
These values are automatically passed over into the two standard parameters of the "main" function of the program and can be used within the program during runtime.
"argc" is the argument counter which holds the number of different arguments which were passed to the program upon starting it. Each character or value behind the name of the program which is separated by a blank space from the other values is a single argument.
"argv" is the argument vector which contains all the charaters, words and values that have been passed to the program from the command line. In order to use these values wihtin the program, the argument vector has to be analyzed step by step.
In our first "Hello World" program, we do not really need these parameters to control the program, but we can just leave them in as this does not have any negative effects on the program.
Application object
In the next line of the program, there are actually two things happening at the same time:
First, this is a variable definition just like the ones for the function parameters. In this case, the variable name is simply "a" and the type is "QCoreApplication".
The "QCoreApplication" is an object class from the Qt Core class libary which we got earlier from including the according file. It expects the two standard variables "argc" and "argv" as parameters, so these are passed in brackets, separated by a comma just after the name of the new object "a".
The variable "a" is officially called an "instance" of the object class "QCoreApplication".
This difference in naming - "instance" instead of "variable" - is due to the fact that an object class contains more than just the definition of a variable data type.
Object classes contain variables as well as functions with which the values of these variables can be computed properly.
So when you define a variable by using an object class as its type the variable automatically inherits not only all internal variables of the object class but also all functions of the object class.
Text output
The next line in the program prints out some text:
This instruction calls up the function "printf" from the "stdio" function library. The "printf" function needs a variable or fixed character string as its parameter. In this case, we simply pass the text "Hello, World" to the function by writing it between double quotes.
The additional characters "\n" after our output text represent special control characters for controlling a part of the output. "\n" stands for a new line control character. By using this, the (invisible) text output cursor jumps to the next line after writing the text "Hello, World" to the output screen.
If you add additional text after the "\n" character and start the build and run process again, you will see that it is written in a new line. If you delete the control character sequence from the text, everything is written in the same line.
Application loop and output
The last line of the program right before the wavy bracket which marks the end of the "main" function is the following:
This instruction again combines two things into one. The "return" commando is used to set the return value of the surrounding function, in this case "main".
The value of the function is passed back right to where the function has been called up in the program. As the "main" function is started automatically at the start of the program, in this case the return value is passed back to the operating system.
If the program is terminated normally, in a controlled way, the return value should be zero. If there was an error or if the program was aborted by force somehow the return value will be an error code. The operating system then tries to find the code in its internal list of possible errors and pops up a window with the corresponding error message.
In our case, the value which is passed back to the operating system is determined by the return value of "a.exec()".
With "a" being our application object, "exec" is one of the functions defined as part of the object class "QCoreApplication". It does not require any parameters, so the brackets behind the function name are left empty.
The functions within an object class definition are officially called "methods" of the object class (and its object instances).
They can be easier separated from functions outside of object classes this way.
Otherwise they are essentially the same thing.
The "exec" method creates and opens a new application window. This is a simple window which displays a typical, classic console application with basic text output and input functionality inside of the window.
Additionally, the window has some functionality to handle the standard "window close" action which you can call up by clicking on the usual close button of the window.
Any calls to input and output functions which use the standard input and output channels are automatically rerouted to the new console window. This way, our "Hello, World" text is printed inside the window.
The "exec" function also has a main loop inside of it. While I'll explain loop structures to you in a later part of this tutorial, it is good to know here that this is used by the program to wait for any further input, output or event until the program is terminated or the window is closed.
You can also notice one other thing from looking at the source code of our little program:
In C and C++, lines with instructions which tell the computer to directly do anything are finished with a semicolon character. This goes for separate type and variable definitions as well as for instructions within a function.
The exeptions to this are include directives which include functions from an external library and the start and end of function definitions.
If you leave out a semicolon where it should be, the compiler will usually bring up an error in the line (or possibly the line following it) where the semicolon is missing.
Doing the same things differently
As a first short demonstration that you can usually achieve the same result by using different ways in your program, let's change the program a little.
First, replace the line
with
After the changed include line, add a new line of code with the following text:
Then, in the "main" function, replace the line
with
The rest of the program remains the same, so it now should look like this:
If you save the program and compile, link and run it again (using the green "run" button), the final output should look similar to the one before, with only a small change to the text.
Explanations for the new version
So what is the difference here if the program does the same things as in the first version?
Using an output stream
With the new coding, we have effectively switched over from the classic C input/output function libary to the newer C++ standard input/output function library which is called "iostream".
The name implies that all the functions inside this library handle input and output of data in the form of streams, very much like a stream of signals in an electrical line or the stream of water running through a system of connected pipes.
The interesting addition in comparison with the classic C input/output functions here is that these "signal streams" can be redirected between different paths of input and output. For example, you can set up a text input stream using the console and an output stream to a text file and connect both streams. This automatically writes every written character directly into the file.
The "cout" command replaces the "printf" command here. It also prints out data onto the standard console. The input for "cout" in this case comes from our text string with the "Hello World!" message.
The double "less than" brackets are used like a direction pointer here. When streams are used for input and output, the double brackets mark the direction for the redirection of the stream. The C++ language definition expects a definition or a language keyword or function call at the start of a line of code, so changing the line to " "Hello World!\n" >> cout;" does not work, even if the logic would be the same.
Referencing a namespace
With the instruction "using namespace std;" the new version of the program references a namespace of an object library, in this case the "std" (standard) library.
In order to use any functions or object classes which have been defined outside of your own program (like the functions and classes for basic input and output of data) you usually should add such a reference to the according namespace.
With the namespace reference, you can use any function which has been defined as part of the namespace without having to add the relevant namespace prefix every time, e.g. "std::cout". This acts like an expansion of the C++ programming language.
Final words and source code download
As you see, there is a lot to learn even from such a deceptively simple program. It may seem to be too much information right now, but it is important to understand the basics as far as possible.
I'll try to explain anything new in detail until all necessary things have been covered, leaving out only explanations for this which I wrote about earlier.
If something isn't clear to you later on, take a look back to these first steps or have a look at the list of technical terms and their definitions.
For additional reference I have put the project and source code files for this tutorial into a git repository and uploaded it to GitHub. It is one combined repository for all parts of this tutorial, and you can find the code for this first part in the "HelloWorld" subdirectory.
If you already have git or GitHub desktop installed, you can clone the tutorial repository. Alternatively, you can download a ZIP-file of the repository.
- Home
- C++ with Qt Tutorial
- The first program